Showing posts with label Camera. Show all posts

3 November 2011


OFFICIAL PRESS RELEASE
The Lomographic Society Proudly Presents

The LomoKino - Super 35 Movie Maker

Lomography in Motion: Take the next step in Lomography with the first camera that makes your Lomographs move on any kind of 35mm film
Unique Art: Become the director of your very own LomoMovies and produce unique and precious pieces of movie art by simply winding a crank
True Gadget: Irresistible design and unlimited creative possibilities will make gadget lovers’ hearts pound faster
LomoMovies Online: Upload, watch and share your very own LomoMovies on www.lomography.com

Lomography in Motion
How great it must have been to witness the first pictures as they started to move or to see the Lumiere brothers amazing the crowds with their very first short films. After over 200 years of movie making, million-dollar-special-effects, big scale film studios and endless Hollywood dramas, we give you the chance to return back to the roots of movie making and witness the very first steps of moving Lomography. The LomoKino allows you to become a director yourself and capture Lomographic movies on 35 mm film of any kind: no sound, no special effects, no post production – just simple Lomography in motion.

Unique Art
To become a true LomoMovie director, just simply wind the crank of the magic box to capture 144 shots on one roll of 35 mm film - which makes 36 to 48 seconds of LomoMovie. You can use any kind of 35 mm film for different effects: Slide film, colour negative, redscale or B/W. After developing the film, spool it into the specially developed LomoKinoScope and watch your Lomographs moving over and over again. What sounds very simple produces a unique piece of art which can either stay in your hands only or can be given as a special present to somebody who really deserves it. Show your sweetheart how fast your heart is really pounding or capture a flying birthday cake for your grandma who will feel catapulted back in time.

True Gadget
A wise man once said “form follows function” – naaaah – we like to say “form follows motion” and that’s why we designed this camera to become a true gadget. Its irresistible design takes you straight back into the time when people left the audience screaming because a locomotive was speeding towards them on a movie screen and the movies were still a true business without special effects. It comes in a package either alone or with the LomoKinoScope, one film canister and a marvelous book. Its creative possibilities are so diverse that not even we can tell the limits. It’s up to you, gadget lovers, to take this baby in your hands and explore what movies used to be like the Lomographic way!

LomoMovies Online
Unlike the very first filmmakers we can call a powerful tool our own: the internet! Linking the simple technology of the LomoKino with our website, enables you to upload, watch and share your own LomoMovies. To give you a taste of the special LomoKino aesthetics and the sheer endless creative possibilities, we asked filmmakers from around the globe to create their own LomoMovies. Visit our website to get some inspiration and start shooting your first LomoMovie!

www.lomography.com


Technical Details
Film type: all kind of 135 roll film
Lens: 25mm
Exposure area: 24mm x 8.5mm: 144 images/film
Continuous Aperture: f/5.6 - f/11
Shutter: 1/100
Hand cranked: approx. 3-4 fps, 36-48 sec. movie per roll
Film counting: volume display
Focusing: (normal) 1m~infinity,(press button for) 0.6m close up
Tripod mount: yes
Retail price: tba

WHAT THE HELL IS LOMOGRAPHY? 
http://www.lomography.com/about

The Lomographic Society International is a globally active organization dedicated to experimental and creative snapshot photography. Boasting over a half-million members across the world, the concept of Lomography encompasses an interactive, vivid, blurred and crazy way of life.
Through our constantly expanding selection of innovative cameras & photographic accessories, we promote analog photography as a creative approach to communicate, absorb, and capture the world.
Through the efforts and skill of our Lomographic Society members, we seek to document the incredible planet around us in a never-ending stream of snapshots – literally a global “Lomographic” portrait as seen through the eyes of countless individuals and cultures.

The Future is Analogue!

Leia Mais…

10 August 2011

Refurbishing a Trip 35


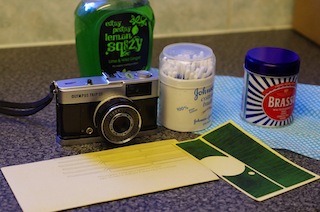
Having picked up a faulty Olympus Trip 35 for £5 it was time to attempt a fix and refurbish to restore the camera to working condition. Top priority has to be working mechanicals but I also prepared to clean and re-skin the camera too. If you wish to undertake the task yourself I would advise the following materials and tools:

  • Small screwdrivers
  • Stanley/craft knife
  • Lighter fluid
  • J-cloths
  • Micro fibre cloth
  • Cotton ear buds
  • Brasso
  • Washing-up liquid
  • Pencil
  • Cocktail or lollipop sticks
  • Ice-cube tray to hold screws safely
  • New skin
  • New light seals


Firstly you need to check the meter is working correctly. To be absolutely certain it is you’ll need to remove the top plate of the camera and check the needle movement. Start by removing the screw in the left hand side under the wrist strap lug. Two more screws can be found under the rewind crank. To get to these simply open the back, wedge something like a lollipop stick in to stop it spinning and unscrew the crank from the top.


With the top off you should now have access to the meter, or more importantly the meter needle. With no light entering the camera (cover the front of the lens with your hand) the needle will be pushed up against the viewfinder. Now point the lens to some bright light and the needle should swing to the middle. This confirms the meter is working. In that case (as with this particular camera) the fault lies with the aperture blades.


The top can now be reassembled but be sure to clean any muck from hard to reach areas as you do to make cleaning the camera later a little easier.

To get to the aperture blades start by removing the bottom plate of the camera by unscrewing the two small screws. Now turn your attention to the front inner ring (with the writing on) and locate the three small screws around the rim. Before you remove them set the aperture to ‘A’ and the focal length to infinity (the mountain symbol). Now loosen the three screws but do not remove them completely. The ring can now be pulled off.

To remove the front lens element simply unscrew it. It’s important before you move it to mark it so it can be returned into the exact same position. If not the camera’s focus will be off. I suggest a marker or a scratch from a knife on the rim at the 12 o’clock position. Remove the lens, give it a good clean with a micro fibre cloth and set it aside.

Now we need to remove the bulk of the lens from the body. To begin with lift the wires on the bottom of the camera over the tripod thread to loosen them. Now locate the three deeper screws inside the lens and remove all three. The lens will now pull off the body exposing the middle element. Remove this and clean it also.


Now we get to the important aperture blades. Remove the screws holding it in place and start to work it with your fingers. It should open and close easily enough. Now take the lighter fluid and thoroughly clean the blades and surrounding metal. Keep working them and you should notice they move more freely. Leave the blades to fully dry or use a hairdryer. It’s important not to lubricate the blades as they will eventually stick again. To aid lubrication you can rub some graphite onto the blades simply using a craft knife or stanley blade to shave the end of a soft pencil (I used a 3B). Blow away any excess.


With the blades now moving with ease clean the rear lens element and trace back through your steps to reassemble the lens. Remember to align the front element as you marked it at the start. Once the lens has been assembled move the focal length dial one way then the other to make sure the front element is rotating at the same time.

If everything looks good it’s time to test. The easiest test is to leave the aperture on ‘A’, cover the lens and try to depress the shutter. If everything is now working the shutter will not fire and a red flag will be shown in the viewfinder. Removing you hand from the lens and trying again should allow the shutter to fire.

You can also see the apertures in action by selecting them manually and either pressing the shutter half way. At 2.8 the hole will be nice and wide whereas 22 will have a very narrow hole. These tests confirmed that the repair in this particular camera were successful!


With the mechanics now working you can turn you attention to the looks. Start by pulling off the camera’s current skin which should peel off quite nicely. Now locate the old messy light seals by the hinge of the door and clean these up. With the old seals removed stick the new ones in place using a cocktail stick to get into the hard to reach areas.


At this point you can give the camera an all over clean with some mild washing-up liquid and water mix with a slightly damp cloth and allow it to dry. Now polish the camera with something like Brasso liquid taking care to avoid the parts the new skin is going to be stuck to. Depending on the condition of the camera you could use ultra fine git sandpaper or polish to really go to work on the camera. This is something I may look to in the future for the silver coloured parts.


The new skins are relatively easy to attach. They don’t fix permanently so you can correct any errors. Be sure to get the skin right under the lens for a good fit. Now get the cocktail stick into any hard to reach areas and wipe over the skin to make sure there are no bubbles and it’s firmly in place.

Done!


You could go further and paint over the black painted parts that have worn over time but if like me intend on using the camera and not displaying it’s probably not worth it. More importantly be sure to run a cheap film though the camera to test the focus wasn’t incorrectly set when putting the lens back together. If it was remove the front inner ring again, give the front element a 1/4 turn maximum and try again. Alternatively there are more detailed instructions on the internet to help reset the focus.

Leia Mais…

5 July 2011

Lomography Supersampler Review


Back when Lomography first grabbed my attention two camera types interested me the most. The first was the premium LC-A and the second the cheap-as-chips Supersampler. I haven’t yet managed to lay my hands on an LC-A but I have quite recently bought my first Supersampler.

For those who don’t know (although it’s quite difficult to miss!) the Supersampler has an arrangement of four 24mm lenses on the front of the camera that will fire when the shutter is pressed. This can be pre-selected as four photos in two seconds or four photos in 0.2 seconds. And that’s about it. No other settings to fuss around with, no worries about focussing and framing is literally ‘point and shoot’.

One notable feature is the film winding mechanism. There is a rip cord on the side of the camera that both advances the film and cocks the shutter. Although quite novel it’s worth reading the instruction manual well as breakages can occur with over enthusiastic pulling of the cord.

Typically of Lomography cameras it is packaged very well (almost too well as the packaging seems to contain both more weight and quantity in plastic than the camera itself) and an included 144 page book serves as an example of the kind of photos you can expect to take.

Moving onto the camera itself the rubberised feel gives the camera a tactile quality and although lightweight it feels sturdy enough in the hand and not as delicate as I expected it to be. The rubber viewfinder window on the side seems rather pointless though and after falling off a few times I just left it in the box. The point and shoot nature of the camera means it’s not all that important anyway.

Loading the film was a straightforward affair and following the instruction manual should mean no mistakes are made. A pull on the rip cord (again, nice and gently) and it’s ready to go.

Camera: Lomography Supersampler Blue
Film: Kodak Ultramax ASA400
Location: Forest Fields, Nottingham
Processing: Asda 1 Hour, scans to CD

Due to the camera being able to capture motion and movement in its four frames I made the focus of the test Emily playing in the park. I went against the advice of the Lomography website too and used ASA400 rather than the recommended ASA800 as it was a sunny and bright day. With 24 frames soon used the 1 hour lab beckoned.

My first impressions upon seeing the results were joy and amazement. I’d never captured anything like this before on any other camera. The manner in which the camera captures those four frames to create a movie like effect is fantastic. To see Emily frozen in four time frames coming down a slide gives the photo an almost animated effect.


As well as this all important feature the camera’s exposure and focussing was spot on and those used to lomography type cameras will have no complaints in this department. I would say the photos are on the soft side but worlds apart from the dreamy softness of something like the Diana Mini.

Overall I would rate the Supersampler very positively. It captures images in a way you’ve probably not done so before and is an experience in itself. The camera is very light and compact but feel sturdy enough to survive a drop. On the downside the cord can be fragile and requires finesse rather than brute force and the viewfinder attachment is frankly a waste of time. Finally, and as said before regarding some other Lomography camera, the packaging is a little over the top and adds more weight and cost to the product than is probably necessary.

Ultimately though it’s not an expensive camera and overall the joys from taking those superb four frame shots outweigh any of the minor negatives. This is definitely one little camera I would recommend.

Leia Mais…